Fix Problem with Wireless Adapter or Access Point on Windows 10
Make sure to create a restore point just in case something goes wrong.
Fix Problem with Wireless Adapter or Access Point on Windows 10 Method 1: Connect via Wired Connection Method 2: Remove your current Wi-Fi profile Method 3: Make sure to use the correct Password Method 4: Enable Wireless Adapter Method 5: Reset Wireless Router Method 6: Turn on WMM option for your router Method 7: Update Network Drivers Method 8: Flush DNS and Reset TCP/IP Method 9: Temporarily disable Antivirus software Method 10: Enable Wireless Network Related Services
Method 1: Connect via Wired Connection
It is quite understandable that connecting the laptop with a wired connection for the internet kills the vibe, well not for everyone but for some people it does. But if you’re not able to access the internet using the WiFi, the best alternative is to try to connect to the Internet via a wired connection. You just need to connect your laptop to the router with the LAN cable. This may be able to solve your issue and you will get the internet connectivity back.
Method 2: Remove your current Wi-Fi profile
You may not able to access the internet because of the corrupted wireless profile. If this is the issue then it can cause the problem with wireless adapter or access point. So you need to either remove your current wireless or WLAN profile or forget the current Wi-Fi network. Now there are 3 ways via which you can do, use this guide to follow one of them.
Method 3: Make sure to use the correct Password
One of the most common problems with wireless adapter or access point is not entering the right password. You may accidentally be entering the wrong password therefore, it is recommended to double-check that you are entering the right password to access WiFi. Did you check the keyboard? Yes, sometimes particular keys of your keyboard may not be inserted due to which you would not be able to insert right password. Let’s try On-screen keyboard to enter the correct password and check if you are able to connect with the internet.
Method 4: Enable Wireless Adapter
Sometimes the wireless adapter gets disabled due to installing of any third-party software on your system. You need to check the settings to ensure that it is not disabled: 1.You need to open Device Manager. Press Windows Key + X and choose Device Manager.
2.Under Device Manager, expand Network Adapters. 3.Next, double-click on your wireless adapter device to open its Properties window. 4.Navigate to the Driver tab and look for the Enable button. If you don’t see the Enable button, then it means the wireless adapter is already enabled.
Method 5: Reset Wireless Router
If your router is not configured properly, you may get the error message on your device regarding wireless adapter. You just need to press the Refresh button on your router or you can open the settings of your router locate the reset option in setting. 1.Turn off your WiFi router or modem, then unplug the power source from it. 2.Wait for 10-20 seconds and then again connect the power cable to the router.
3.Switch on the router and again try to connect your device and see if this Fix Problem with wireless adapter or access point.
Method 6: Turn on WMM option for your router
This is another workaround to fix the problem with wireless adapter or access point on Windows 10. However, it seems a bit weird solution but many users reported that they solved their wireless adapter problem with this method. 1.Press Windows key + R then type devmgmt.msc and hit Enter to open Device Manager. 2.Now expand the Network Adapter section. It will open a list of all network adapters installed on your system. Here you need to right-click on your wireless network adapter and select Properties.
3.You need to navigate to the Advanced tab and locate the WMM option.
4.Select the WMM option then from the Value drop-down select Enabled. Hopefully, now you will be able to get internet connection via your Wireless adapter.
Method 7: Update Network Drivers
1.Press Windows key + R and type “devmgmt.msc” in Run dialogue box to open device manager.
2.Expand Network adapters, then right-click on your Wi-Fi controller(for example Broadcom or Intel) and select Update Drivers.
3.In the Update Driver Software Windows, select “Browse my computer for driver software.“
4.Now select “Let me pick from a list of device drivers on my computer.“
5.Try to update drivers from the listed versions. 6.If the above didn’t work then go to the manufacturer’s website to update drivers: https://downloadcenter.intel.com/ 7.Reboot to apply changes.
Method 8: Flush DNS and Reset TCP/IP
1.Right-click on Windows Button and select “Command Prompt(Admin).“
2.Now type the following command and press Enter after each one:
3.Again open Admin Command Prompt and type the following and hit enter after each one:
4.Reboot to apply changes. Flushing DNS seems to Fix the Problem with wireless adapter or access point.
Method 9: Temporarily disable Antivirus software
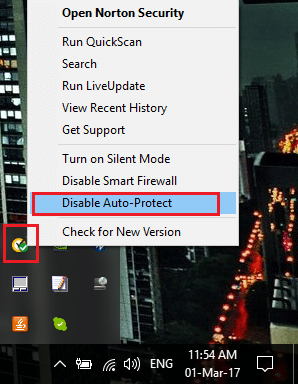
Sometimes the Antivirus program can cause the Network Adapter Driver issue and in order to verify this is not the case here, you need to disable your antivirus for a limited time so that you can check if the error still appears when the antivirus is off. 1.Right-click on the Antivirus Program icon from the system tray and select Disable.
2.Next, select the time frame for which the Antivirus will remain disabled.
Note: Choose the smallest amount of time possible for example 15 minutes or 30 minutes. 3.Once done, again try to connect to the WiFi network and check if the error resolves or not.
Method 10: Enable Wireless Network Related Services
1.Press Windows Key + R then type services.msc and hit Enter.
2.Now make sure the following services are started and their Startup type is set to Automatic: DHCP Client Network Connected Devices Auto-Setup Network Connection Broker Network Connections Network Connectivity Assistant Network List Service Network Location Awareness Network Setup Service Network Store Interface Service WLAN AutoConfig
3.Right-click on each of them and select Properties. 4.Make sure the Startup type is set to Automatic and click Start if the service is not running.
5.Click Apply followed by OK. 6.Reboot your PC to save changes. Recommended:
Fix Critical Structure Corruption Error on Windows 10 Speed Up Your SLOW Computer in 5 Minutes! Download & Install DirectX on Windows 10 How to Start Outlook in Safe Mode
I hope with the help of the above steps you were able to Fix the Problem with wireless adapter or access point. If you still have any questions regarding this guide then feel free to ask them in the comments section.


